
An Elevator Guide Rail Bracket may look like a small steel fitting, but it helps keep the guide rail securely positioned as the elevator moves. Its dimensions, material, and connection points affect how loads travel into the supporting structure. A bracket that appears sturdy on a workbench may still be unsuitable for a particular rail or building. Details matter.
On site, installers check rail alignment, bracket spacing, anchor locations, and clearances around nearby equipment. Even a small mismatch can make adjustment difficult or leave the rail poorly supported. The right choice depends on the elevator system, expected loads, mounting surface, and operating environment—not appearance alone. Corrosion resistance matters in damp or exposed areas, while fasteners must suit both the bracket and the substrate. Compatibility matters.
These seven tips offer a practical way to compare options: verify dimensions, review material and finish, confirm load requirements, inspect mounting details, check system compatibility, consider installation access, and plan regular inspections. Product drawings and manufacturer guidance can help, but they do not replace assessment by qualified elevator professionals. A checklist helps, yet it cannot catch every site condition. That is easy to forget when a part seems standard. Careful selection supports reliable installation and maintenance, while honest review of the actual conditions keeps assumptions in check.
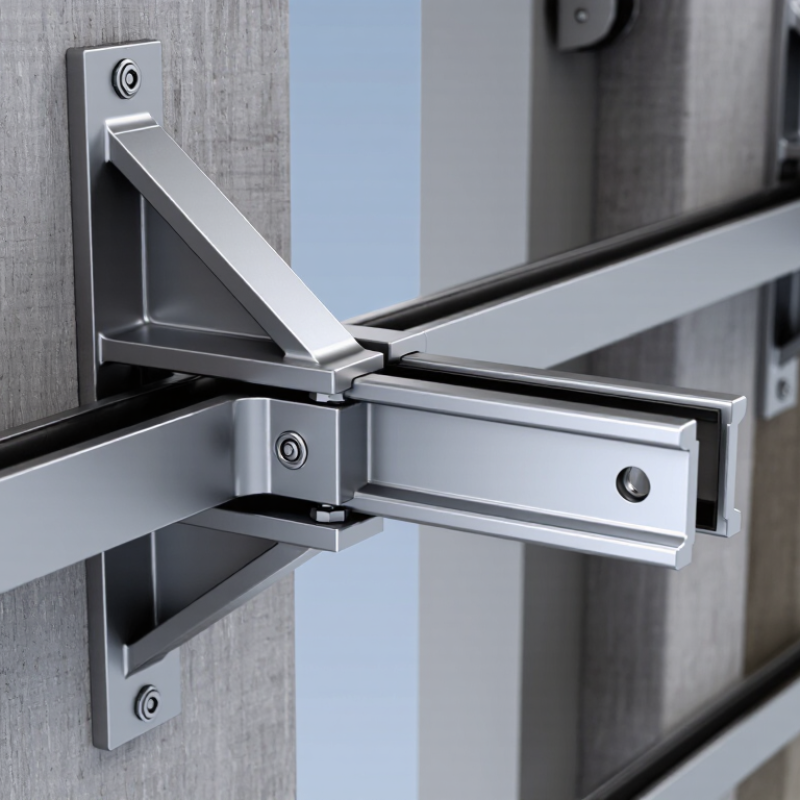
Guide rail brackets anchor the rails to the hoistway wall and help keep the car’s path aligned. They transfer lateral forces from the rails into the building structure. Small part. Big consequence. A loose connection, uneven wall, or poorly chosen bracket can affect alignment and increase vibration. Brackets may be fixed, adjustable, or designed for particular wall and rail arrangements. Adjustable types help installers correct small alignment differences; they do not replace proper structural design. Selection should account for rail loads, bracket spacing, wall material, fasteners, and expected building movement.
For project-specific requirements, consult applicable lift standards, including EN 81-20, and the engineer’s approved calculations. On site, inspect the bracket seating, fastener engagement, and clearance around the rail. A useful check is to compare the installed spacing with the approved drawings.
Walls are rarely perfect. It is tempting to solve every mismatch with an adjustable bracket, but that may hide a mounting or structural issue that needs review.
An elevator guide rail bracket should be matched to measured specifications, not chosen by appearance. Check the rail profile, width, depth, and fixing method against the bracket drawing. A caliper and the rail manufacturer’s dimensional sheet can reveal differences that a quick visual check misses. Small mismatch, big trouble.
Confirm that the bracket suits the elevator’s design loads and the specified bracket spacing. These values depend on the installation, so avoid relying on a generic capacity estimate. Check the adjustment range, bolt sizes, and connection points, too. The bracket must attach securely to its supporting structure, whether that is concrete or steel. Anchor selection should reflect the actual substrate and approved engineering details.
Alignment matters. A bracket that cannot be adjusted enough may leave the rail out of position, even when its dimensions seem right. Review installation drawings and product documentation before ordering, then verify the fit on site. I would not assume two brackets are interchangeable just because they look similar. That shortcut can create rework. Also consider moisture and other site conditions when checking material and finish requirements. If a specification is unclear, ask the elevator designer or qualified installer to confirm it before installation.
An elevator guide rail bracket must hold the rail steady under operating forces, not merely match its dimensions. Check the specified loads, bracket spacing, anchor type, and shaft-wall material together. A strong bracket fixed into weak concrete can still shift. Ask the design team to confirm the allowable load and safety factors against the project drawings and applicable elevator requirements. Do not guess from appearance. A thick plate is not proof of adequate capacity.
Material choice matters in damp or chemically exposed shafts. Carbon steel with a suitable protective coating may work in a dry interior, while stainless steel can be appropriate where moisture is persistent; confirm compatibility with nearby metals to limit galvanic corrosion. ISO 12944-2 groups atmospheric exposure into corrosivity categories, from C1 to CX, which can help screen coating needs. It is a reference, not a substitute for an elevator specification. NACE International’s 2016 IMPACT study estimated global corrosion costs at US$2.5 trillion annually. That figure makes corrosion worth considering early. Still, a neat coating can hide damage beneath it. Inspect cut edges, welds, and anchor points, and document the selected material and coating for future maintenance.
Before choosing an elevator guide rail bracket, check the approved drawings and the elevator system’s installation requirements. Rail size, bracket spacing, fastener type, and allowable loads must match the specified arrangement. A bracket that fits the rail may still be unsuitable for the wall or support frame. Small details matter.
Inspect the actual building conditions, not just the plans. Concrete walls may vary in strength, while steel supports may need specific connection details. Look for beams, embedded plates, service lines, and uneven surfaces where each bracket will sit. Measure the available clearance and check whether installers can reach the fixing points with their tools. These details affect alignment and installation time.
A site survey can reveal differences between drawings and finished construction. Record wall material, surface condition, and distances between supports, then confirm any uncertain loads or anchor requirements with the project engineer. Do not assume every floor is identical. That assumption is easy to make, and sometimes wrong. If the substrate is cracked, thin, or concealed behind a finish, pause and verify the support before selecting hardware. Rechecking one awkward location is better than forcing a bracket into place.
7 Tips for Choosing an Elevator Guide Rail Bracket
Verify the bracket against the elevator’s approved drawings and the applicable edition of ASME A17.1/CSA B44. A component that fits the rail may still be unsuitable for its load, fasteners, or supporting structure. NEII’s published industry facts estimate that U.S. elevators carry about 18 billion passenger trips each year. That scale makes secure, well-aligned rail support more than a detail. Check material specifications, fastener grades, and installation requirements; do not rely on appearance alone.
Adjustability helps installers align rails when actual site dimensions differ slightly from drawings. Look for adjustment that is controlled and lockable, not a slot that leaves the bracket free to shift. Small details matter. Confirm the manufacturer’s permitted adjustment range and check that fasteners remain accessible for inspection. Maintenance needs should shape the choice, too: exposed surfaces, drainage, corrosion protection, and clearance for tools affect later checks. ASME A17.1/CSA B44 provides safety requirements for elevator design, installation, inspection, and maintenance, but the project’s adopted code and engineering documents determine the specific application. A practical oversight: brackets can be correctly specified yet difficult to inspect after finishes go in. Plan access before installation, and record alignment and torque checks for future technicians.
| Tip | What to Check | Evidence or Acceptance Criteria | Maintenance Consideration |
|---|---|---|---|
| 1. Verify applicable safety standards | Identify the elevator code and local requirements applicable to the project and installation location. | Confirm the design and installation documents address the locally adopted code, such as EN 81-20/50 or ASME A17.1/CSA B44, where applicable. Confirm requirements with the responsible elevator professional or authority having jurisdiction. | Keep code, inspection, and installation records available for future inspections and alterations. |
| 2. Confirm loads and structural support | Check that the bracket, fasteners, supporting wall or steelwork, and connections are suitable for the loads specified in the elevator design. | Use project-specific calculations and approved drawings. Do not assume a bracket is suitable based on appearance or dimensions alone. | Inspect the supporting structure and connections for damage, movement, corrosion, or other changes that could affect support. |
| 3. Check adjustability for alignment | Review whether the bracket allows the required horizontal and vertical positioning during rail installation. | Compare the adjustment range with the project drawings and installation tolerances. Ensure adjustment can be made without compromising the specified connection or support. | After alignment, verify that adjustment features and locking hardware remain secure according to the installation instructions. |
| 4. Match the bracket to the guide rail and fixing method | Confirm compatibility with the rail profile, rail clips or fasteners, bracket interface, and building-side fixing method. | Check dimensions and connection details against the approved drawings and component documentation. Avoid mixing components unless compatibility has been verified. | During inspection, look for loose, missing, damaged, or incorrectly fitted connection hardware. |
| 5. Assess material and corrosion protection | Consider the installation environment, including humidity, water exposure, cleaning chemicals, and corrosive conditions. | Verify material and protective finish are specified for the environment and are compatible with adjoining components and fasteners. | Inspect for corrosion, coating damage, or deterioration; follow the maintenance instructions for repair or replacement. |
| 6. Plan access for inspection and maintenance | Check that brackets and their fasteners can be viewed and reached safely during installation and planned inspections. | Review the shaft layout and installation sequence to identify obstructions, access constraints, and any inspection requirements. | Include bracket connections in the maintenance inspection plan and document any findings or corrective work. |
| 7. Review documentation and traceability | Confirm that the selected bracket is supported by clear product, installation, and project documentation. | Retain relevant drawings, material or finish information, installation instructions, and any required calculations or approvals. | Keep records of inspections, adjustments, repairs, and replacements with the elevator maintenance documentation. |
880 W 9th Street
Upland, California 91786
884 W 9th Street
Upland, California 91786
886 W 9th Street
Upland, California 91786
884 W 9th Street
Upland, California 91786